- Smart Stride
- Posts
- What does a 1-on-1 consult with me look like?
What does a 1-on-1 consult with me look like?
A full breakdown of a recent consult.
Tim Roozendaal
August 03, 2025
Today is my birthday 🥳
But instead of asking for presents… I’m giving one.
I decided to break down one of my recent 1-on-1 consults, step by step, so you can get a behind-the-scenes look at what actually happens during a gait analysis and running shoe review.
Whether you're curious about your own stride, or just love geeking out on running form and shoes, this one’s for you.
Q&A Intake
Before the consult, every runner fills in a short intake form. Here's what this runner shared:
Q&A | |
Weekly volume | ~50 km |
Main running goal | Sub 3 hr marathon |
Injuries | Slight niggle on outside of the right knee |
Current rotation | → Saucony Ride 15 (previous marathon) → Asics Saiun 2 → Asics Novablast 4 → Brooks Glycerin 22 |
Looking for: | Nothing specific |
In the Q&A form, you’ll also be asked to upload a video of yourself running.
Running gait breakdown
From this video, I started breaking down his running form. I like to work from the ground up, although, many aspects are related to each other.
First, the foot & ankle.
First, I take a look at the amount of pronation in the mid stance phase. This gives me a few clues on how the ankle stability is.
In his case, you can see there is a little bit of over-pronation. I see this with a lot of runner on the novablast, so I’m not to worried. He ran his previous marathon in the Saucony Ride, which is a neutral shoe, so I don’t think he needs extra stability.
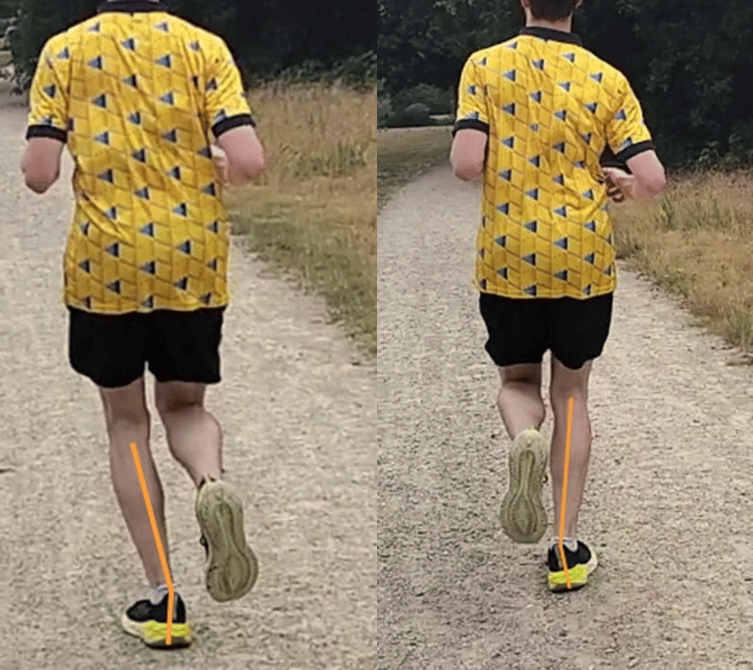
Little bit of over-pronation on both sides
Next, I’m looking at where his foot strikes the ground. He has a back of the midfoot strike. His ankle is in a neutral 90 degree angle when he strikes the ground. This is important to know, because some shoes perform better for mid-foot or heel strikers.
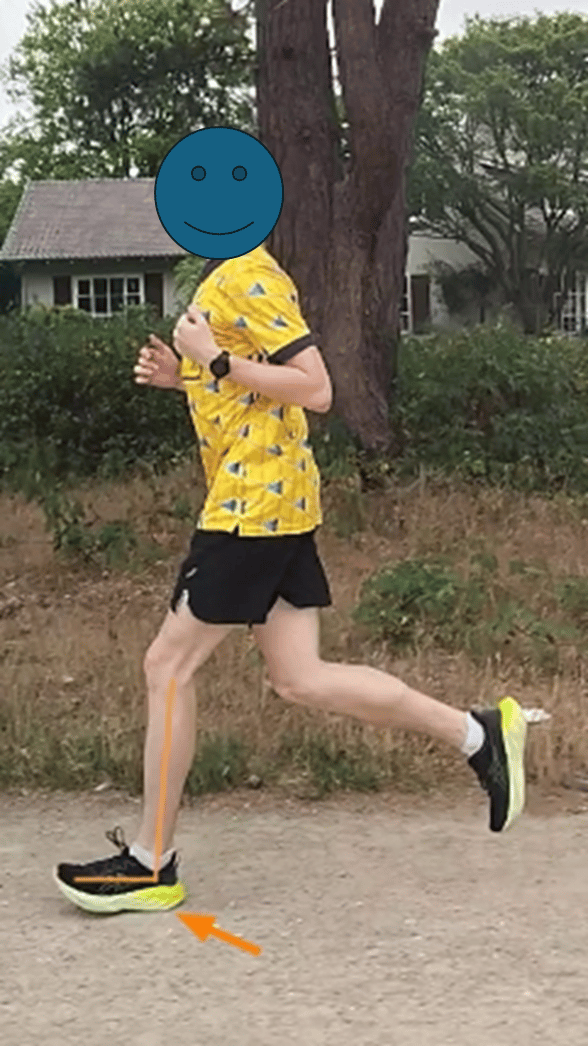
Back of mid-foot strike
So now we have a good idea of where his foot strikes the ground, and how the ankle moves under load.
Next: The hip & pelvis
As we move up the chain, we come across the hip movement. As seen from the first image, there no excessive adduction (knee’s not touching each other), which is a great sign of hip stability. So in the frontal plane, we are looking good.
Then we move to the sagital plane where we can analyse the hip flexion and extension.
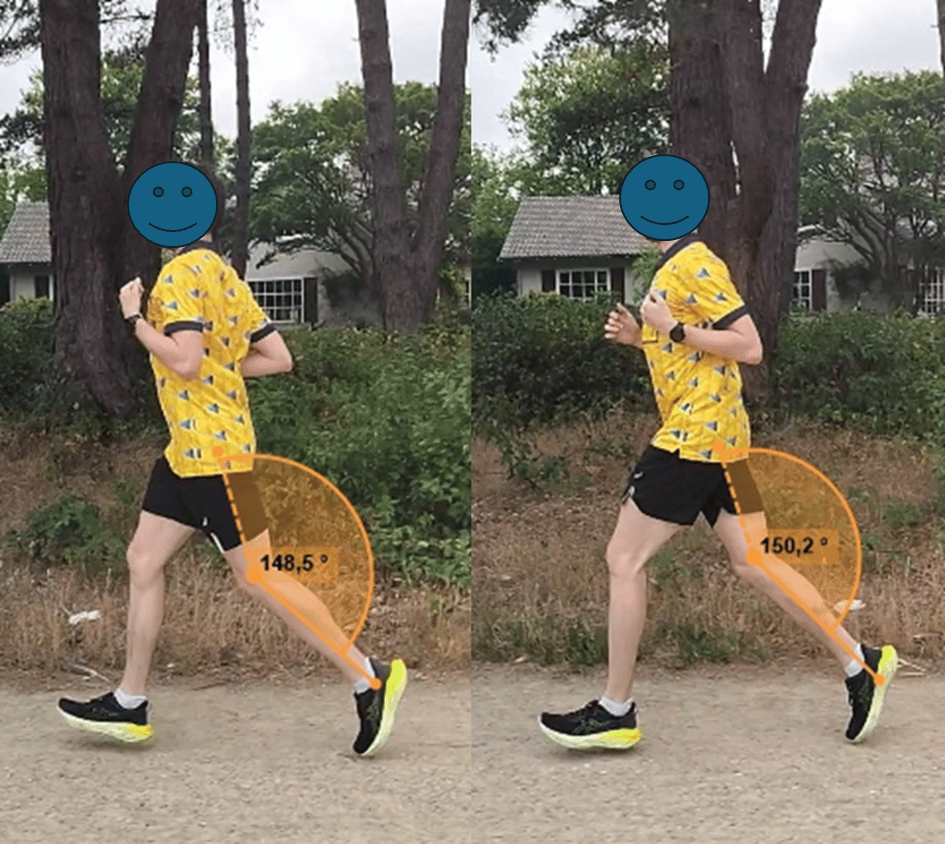
Slight lack of hip extension
Hip flexion looked good, but there is a lack of hip extension. Peak hip extension goes to ~150 degrees, which is on the low side.
Preferably get close to ~175, so almost fully extended. This lack in hip extension also lowers the maximum stride lenght, often resulting on a higher cadence to compensate. This was the case with him too. Often running at cadences higher than 190.
Moving on to the pelvis, there is not much movement. I’m looking for signs of hip drop to see if there is any stability missing. This wasnt the case, he looked solid through his pelvis.
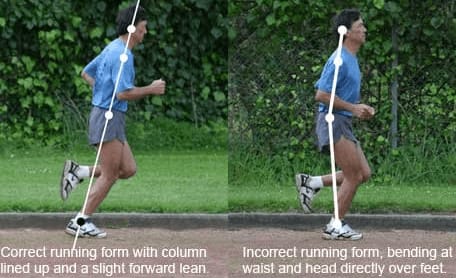
Move on to running posture.
We move up to general running posture:
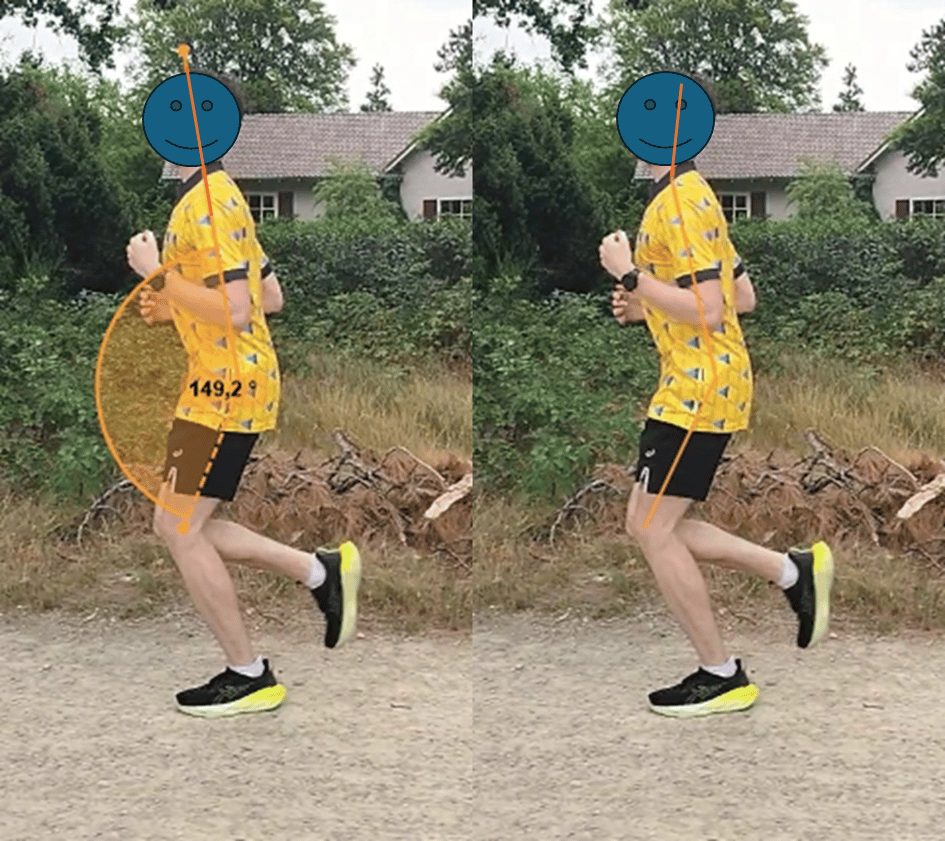
Full body running posture
His posture is slightly ‘seated’, which results a smaller total hip angle. This angle would preferably be a bit larger, close to 170-180. This makes leaning from the ankles easier too. It also leads to compensation further up the kinetic chain. This results in him having to tilt his chin up to still keep his eyes neutral.
This picture below explains the differences in spine position better than I ever could:
Lastly, the arms.
Lastly, I take a look at the movement of the arms.

Arm movement
His arms are very close to his body and don’t move too much. Having loose shoulders, opening the chest up so you can breath more easily and improving the range of motion in the arms, will help you run way more relaxed.
Practical tips
Before talking shoes, I always offer tips to improve posture and form. Better mechanics lead to better results, no matter what shoes you wear.
Here’s what I recommended:
Posture: Imagine a string pulling you up from the top of your head. This cue helps elongate your spine while running.
Hip Extension:
Stretch: Kneeling hip flexor stretch
Strengthen: Glute bridges or hamstring bridges
Arm Mechanics:
Keep arms relaxed and swing from the shoulder
Avoid crossing the center line of your body
Picture reaching for a pistol from a holster — smooth and easy
Finally, the shoes.
Now that I understand his gait and goals, here’s the shoe advice I gave him.
He already has good shoes for easy/steady runs (Novablast 4 and Glycerin 22), but lacks a dedicated fast training shoe — something ideal for threshold runs, intervals, or race prep.
Here are 3 options I recommended:
Model | Task |
Saucony Endorphin Speed 5 | Fast training shoe with more stable character. |
Hoka Mach X2 | Fast training shoe with some stability, but more vertical bounch. Be carefull with the heel cap, as many runner experience issues with it. |
New Balance Rebel V5 | Stable training shoe, with wide platform. But not as fast as the two other models described above |
I also mentioned that getting comfortable with one of these could be a great bridge toward using a carbon-plated racing shoe in the future, to maximize performance.
Final Thoughts 💭
At the end of each consult, I send a full written report, including:
Form cues
Shoe recommendations
A summary of gait findings
Recommended strength/stretching work
Notes from our call (including follow-up questions)
If you’ve ever wondered what your running form actually looks like — and which shoes really suit it — that’s exactly what we’ll dive into.
You’ll get a full gait breakdown, practical tips to improve your form, and clear shoe recommendations that match your goals and running style.
Want to see what’s really going on in your stride?
Thank you for reading!
Tim 👟